
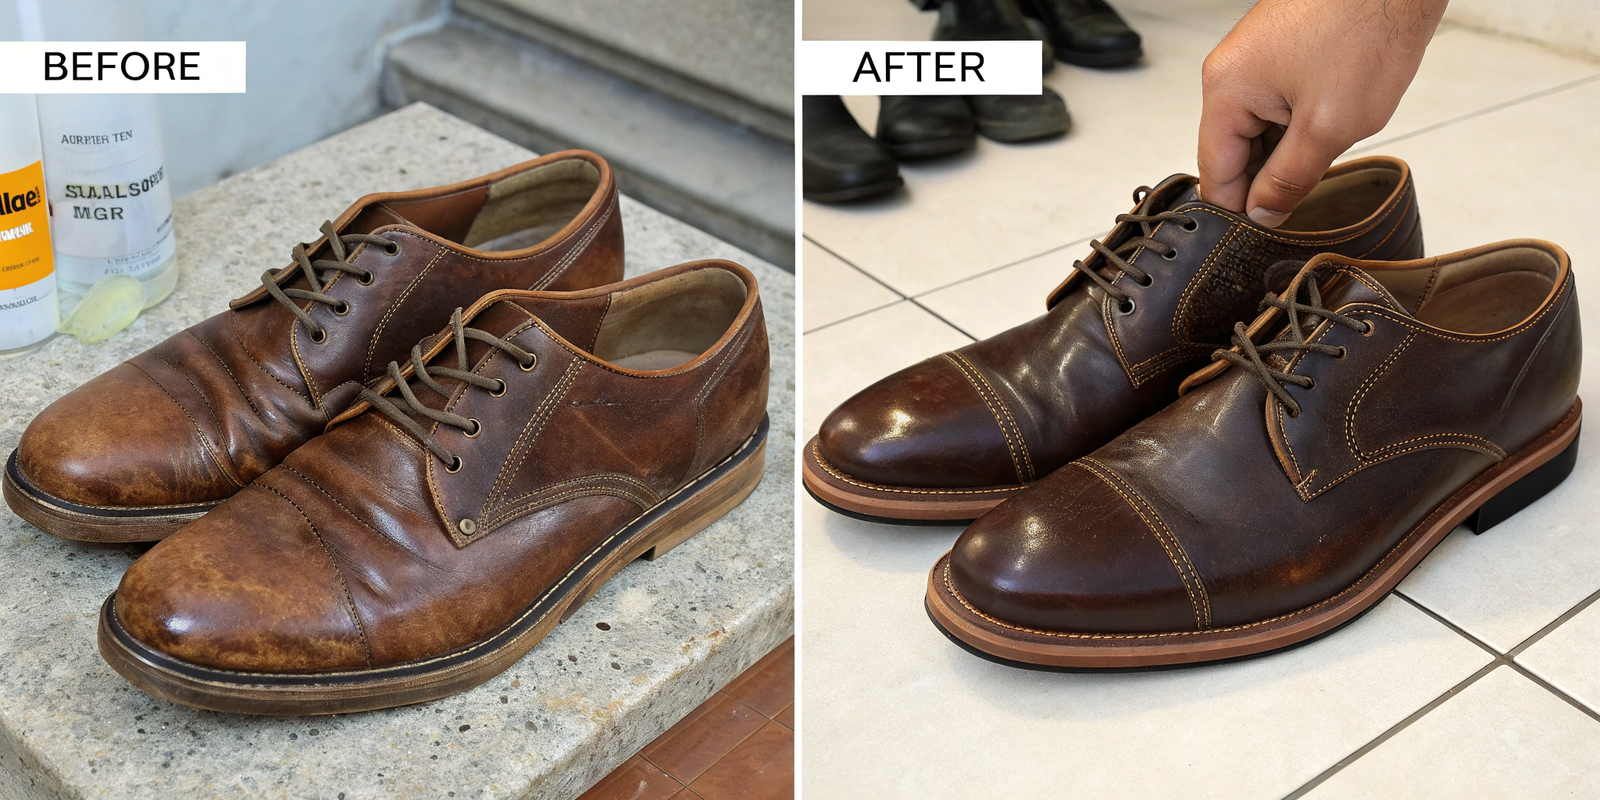
Do you have a beloved pair of old leather shoes that have lost their luster, looking dull and worn? It's frustrating when quality leather no longer reflects its former glory!
To make old leather shoes look shiny again, start with a thorough cleaning to remove dirt and old polish, then apply a conditioning cream, followed by multiple thin layers of wax-based shoe polish, and finish with dedicated buffing for a brilliant, lasting shine.
How to Make Old Leather Shoes Look Shiny Again?
Are your favorite leather shoes looking tired and dull, lacking that crisp, elegant gleam they once had? Don't despair—it's surprisingly simple to restore their brilliant, like-new shine with a little effort and the right approach.
To revive the shine of old leather shoes, thoroughly clean off all dirt and old polish, nourish the leather with a conditioner, apply high-quality wax polish in thin, even coats, and then vigorously buff them to activate the polish's luster and achieve a deep, reflective finish.
Here's my step-by-step guide to making old leather shoes shine again:
- Preparation is Key (Cleaning First): Before you even think about polish, ensure your shoes are spotless.
- Condition the Leather: Once clean and dry, apply a good quality leather conditioner. This nourishes the leather, restoring its suppleness and preventing cracks. Let it soak in.
- Apply Polish (Thin Layers): Use a wax-based shoe polish. Apply very thin, even coats using a cloth or applicator brush. Let each coat dry for a few minutes before applying the next. Multiple thin layers are far superior to one thick layer.
- Buff for Shine: Use a horsehair brush for the initial buffing, then switch to a soft, clean cloth (like an old t-shirt or microfiber cloth) for a high-gloss finish. The friction and pressure create the shine.
This process revitalizes the leather, making it look much more vibrant and reflective. It’s like giving your shoes a deep facial and then a glow-up!
Quick Cleaning Hacks Before Polishing
Are you ready to restore the brilliant sheen to your old leather shoes, but unsure how to properly prepare them for polishing? The secret to a dazzling shine always begins with a truly clean surface.
Quick cleaning hacks before polishing involve using a brush to remove loose dirt, wiping down the leather with a damp cloth and mild soap to lift grime, and using a dedicated leather cleaner or rubbing alcohol on stubborn stains and old polish for a clean slate.
Here are my quick cleaning hacks to get your leather shoes ready for polishing:
- Remove Loose Dirt:
- Tool: A stiff-bristled shoe brush (a dedicated one for shoes is best, but an old toothbrush works for crevices).
- Method: Vigorously brush off any loose dirt, dust, or mud from the entire surface of the shoe. Pay special attention to seams, eyelets, and between the upper and the sole. This prevents scratching the leather during subsequent steps and removes dry debris.
- Wipe Down with a Damp Cloth:
- Tool: A clean, soft, lint-free cloth (old T-shirts work well) slightly dampened with water or a very mild soap solution (like a drop of dish soap in a cup of water).
- Method: Gently wipe down the entire leather surface. This removes surface grime, light stains, and any remaining dust that the brush missed. For stubborn spots, a little more pressure might be needed. Immediately follow with a dry cloth to absorb excess moisture.
- Target Stubborn Stains and Old Polish Buildup:
- Tool: A dedicated leather cleaner (recommended for best results) or a small amount of rubbing alcohol on a cotton ball.
- Method (Leather Cleaner): Follow the product instructions. This is great for lifting embedded grime that the damp cloth couldn't handle, as well as stripping away layers of old polish that might be dulling the current shine.
- Method (Rubbing Alcohol - Use Sparingly!): For very stubborn areas or excess old polish, lightly dab a cotton ball with rubbing alcohol. Gently wipe the affected area. Alcohol can dry out leather, so use it sparingly and immediately follow up with a leather conditioner after cleaning is complete. This is usually reserved for our more aged GRS-certified leather boots where layers of old polish have really built up.
- Clean the Sole Edges and Heels:
- Tool: An old toothbrush or cotton swabs, mild soap, and water.
- Method: Don't forget these areas! Clean the edges of the soles and heels where dirt and grime accumulate. This makes a huge difference to the overall appearance of the shoe.
DIY Polishing Methods
Are you ready to transform your dull leather shoes into gleaming masterpieces, even without professional equipment? Achieving a brilliant shine at home is entirely possible with the right DIY polishing methods.
Effective DIY polishing methods for leather shoes involve applying multiple thin, even coats of high-quality wax polish with a cloth or applicator brush, allowing each layer to dry, and potentially using the "spit shine" technique for an enhanced, mirror-like finish.
Here are my favorite DIY polishing methods:
-
The Classic Cloth Application:
- Materials: High-quality wax-based shoe polish (matching your shoe color or neutral), a soft, lint-free cloth (like an old cotton T-shirt or dedicated polishing cloth).
- Method:
- Small Amount of Polish: Wrap the cloth around two fingers, pick up a very small amount of polish. Less is more.
- Circular Motions: Apply the polish to the leather in small, firm, circular motions. Work in small sections, ensuring an even, thin coat. The goal is to fill in microscopic imperfections in the leather and create a smooth surface.
- Allow to Dry: Let the polish dry for 5-10 minutes. It should look dull and hazy.
- Repeat: Apply 2-3 more thin coats, allowing each to dry. The more thin layers, the deeper the potential shine.
- Why it works: This builds up layers of wax that can then be buffed to a high gloss, protecting the leather while enhancing its color.
-
The "Spit Shine" (Water Drop) Advanced Technique:
- Materials: Wax-based shoe polish, soft cloth, a small dish of water or a spray bottle with water.
- Method (After applying initial base coats):
- Tiny Polish, Tiny Water: Apply a tiny amount of polish onto your cloth. Then, put a single drop of water on the shoe surface where you want to create a mirror shine (usually the toe and heel caps).
- Gentle Overlap: Using the cloth with polish, gently buff the area where the water drop is, using light, very fast circular motions. You're essentially using the water to help emulsify the wax and create a super-smooth, thin layer.
- Repeat: As the water evaporates and the polish thins, the surface will become clearer and shinier. Repeat this process—tiny polish, tiny water, gentle buffing—many times. This can be time-consuming but yields exceptional results.
- Why it works: The water helps to spread the wax incredibly thin and evenly, creating a very smooth surface that reflects light intensely, resulting in that coveted mirror shine. I've used this technique many times on my own Lucas leather shoes, and it never fails to impress.
-
The Applicator Brush Method (for convenience and textured leather):
- Materials: Wax-based shoe polish, a small, stiff applicator brush (often sold with polish kits).
- Method: Dip the brush into the polish and apply it to the shoe with short, brisk strokes. This is faster than a cloth, excellent for textured leather, and good for getting polish into crevices.
- Why it works: It ensures all parts of the shoe are covered, which is particularly useful for our more intricate boot designs or structured leather sneakers.
Buffing Techniques for Maximum Shine
Are you aiming for that head-turning, mirror-like gleam on your leather shoes, but your current efforts fall short? The secret to achieving maximum shine isn't just in the polish, but in the buffing.
Buffing techniques for maximum shine require using a horsehair brush to activate the initial luster, followed by a soft, clean cloth or pantyhose to generate high friction and heat, working in brisk, consistent motions to bring out the deepest, most reflective gloss.
In my extensive experience developing and delivering high-quality footwear at Lucas—from our sleek designs for Europe to rugged boots for South Africa—I've learned that the true magic of polish lies in the buff. It’s the final act that transforms a dull, waxed surface into a brilliant, reflective masterpiece. Our commitment to creating amazing shoes extends to helping you get the most out of them, and proper buffing is crucial for showcasing the quality of our leather.
Here are my top buffing techniques for achieving maximum shine:
-
The Horsehair Brush Power Buff:
- Tool: A good quality, clean horsehair brush (dedicate one brush for dark polish and another for light/neutral if you have multiple shoe colors).
- Method: After the last thin layer of polish has dried (about 10-15 minutes), take your horsehair brush and start buffing vigorously in quick, back-and-forth, sweeping motions. Apply moderate pressure. The goal is to generate friction and heat across the entire polished surface.
- Why it works: The bristles of the horsehair brush are perfect for removing excess polish, spreading the wax evenly, and starting to melt and fuse the polish layers, which creates the initial luster and smooth base for a higher shine. This is essential for getting the initial glow on our leather shoes, whether they are dress shoes or more casual leather sneakers.
-
The Soft Cloth High-Gloss Buff:
- Tool: A clean, dry, lint-free soft cloth. An old cotton T-shirt, a microfiber cloth, or even an old pair of sheer nylon pantyhose (excellent for final high-gloss!) works wonderfully.
- Method: Once you've achieved a good initial luster with the brush, switch to the cloth. Wrap it tightly around your fingers. Using very fast, small, circular motions with light to moderate pressure, buff the shoe. Pay extra attention to the toe and heel caps for that mirror shine. You'll literally see the shine intensifying.
- Why it works: The fine fibers of the cloth, combined with rapid friction, further refine the polish surface, filling in any microscopic ridges left by the brush. This hyper-smooth surface reflects light more uniformly, leading to a deeper, more brilliant gloss. This technique is often used to get that impressive finish on our elegant Lucas heels.
-
The "Breath" or "Haze" Method (for extra pop):
- Tool: Your soft buffing cloth and your breath.
- Method: After you've buffed with the cloth and achieved a good shine, breathe lightly onto a small section of the shoe (like fogging a mirror). The slight moisture and heat from your breath will temporarily create a haze. Immediately, with your clean, soft cloth, buff that hazy spot vigorously until the haze disappears and a new, even brighter shine emerges.
- Why it works: The warmth temporarily softens the wax slightly, allowing the cloth to further spread and refine the polish surface to an even finer level of smoothness. This is a classic trick for an extra "pop" of shine.
-
The Quick Touch-Up Buff:
- Tool: A soft buffing mitt or a dedicated polishing cloth.
- Method: For daily maintenance or quick touch-ups between full polishes, a quick, brisk buff with a clean cloth or mitt will remove dust and reactivate the existing polish shine. No need for more polish.
- My Insight: I always keep a Lucas polishing cloth in my office for quick touch-ups on my leather shoes. It makes a big difference to how they look throughout the day. At Lucas, we prioritize high-quality craftsmanship in our shoes, and these simple buffing techniques are key to showcasing that quality, ensuring your footwear always looks its best.
By mastering these buffing techniques, you're not just shining shoes; you're preserving the quality and aesthetic of your amazing leather footwear, ensuring they continue to inspire confidence and comfort.